Open the menu
With the watch switched on, hold ⚙ for about 3 seconds.

Choose your device and open the quick-start guide or detailed instructions.
Set the time and date. Then pair the table call button with the pager watch.
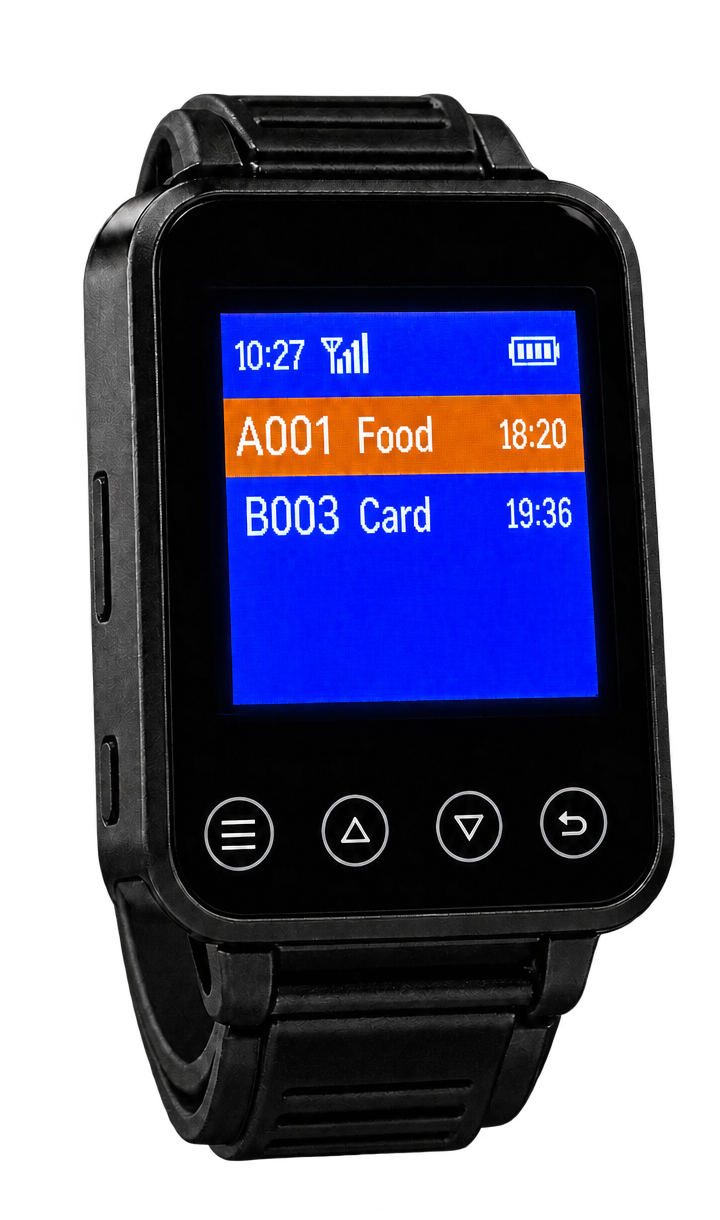
With the watch switched on, hold ⚙ for about 3 seconds.
Use ▲/▼ to select “Time and Date”. Press ⚙ to open it.
Press ⚙ to move to the next field. Use ▲/▼ to set the time and date.
Press ↩. Check the time and date on the main screen.
The receiver pairing steps apply to both the classic table call button and the acrylic CM‑4. The classic model has DRINK, FOOD, CASH, CARD and CANCEL; the CM‑4 has CALL, ORDER, PAY and CANCEL. CALL requests service. ORDER calls staff to take an order, PAY asks for the bill, and CANCEL cancels the call. Assign only the buttons on your model.
Hold ⚙ for about 3 seconds. Use ▲/▼ to select “Administrator Options” and press ⚙. If asked for a password, enter 0000 unless it has been changed.
Select “Add Transmitter” and press ⚙. On some watches, this is called “Add Buttons”.
Press ⚙ to select a digit. Use ▲/▼ to set the table number, for example 1.
Press any button on the table call button. The watch gives a short beep. “Added Successfully” appears on the screen.
“Added Successfully” confirms that the table call button has been saved. Press ↩ to leave the menu.
Press ↩ to return to the administrator menu. Open “Button Function Settings”. On some watches, this is called “Keyvalue Define”.
Select the required function, then press the matching button on the table unit. For the classic model, repeat for DRINK, FOOD, CASH, CARD and CANCEL; for the CM‑4, assign CALL, ORDER, PAY and CANCEL. Function names on the watch may differ.
Press any button on the table call button. Check that the table number and function appear on the watch. If sound is enabled, you will hear a short beep.
Repeat the steps for each table call button. Give each table its own number.
Set the time. Then pair the table call button with the monitor.
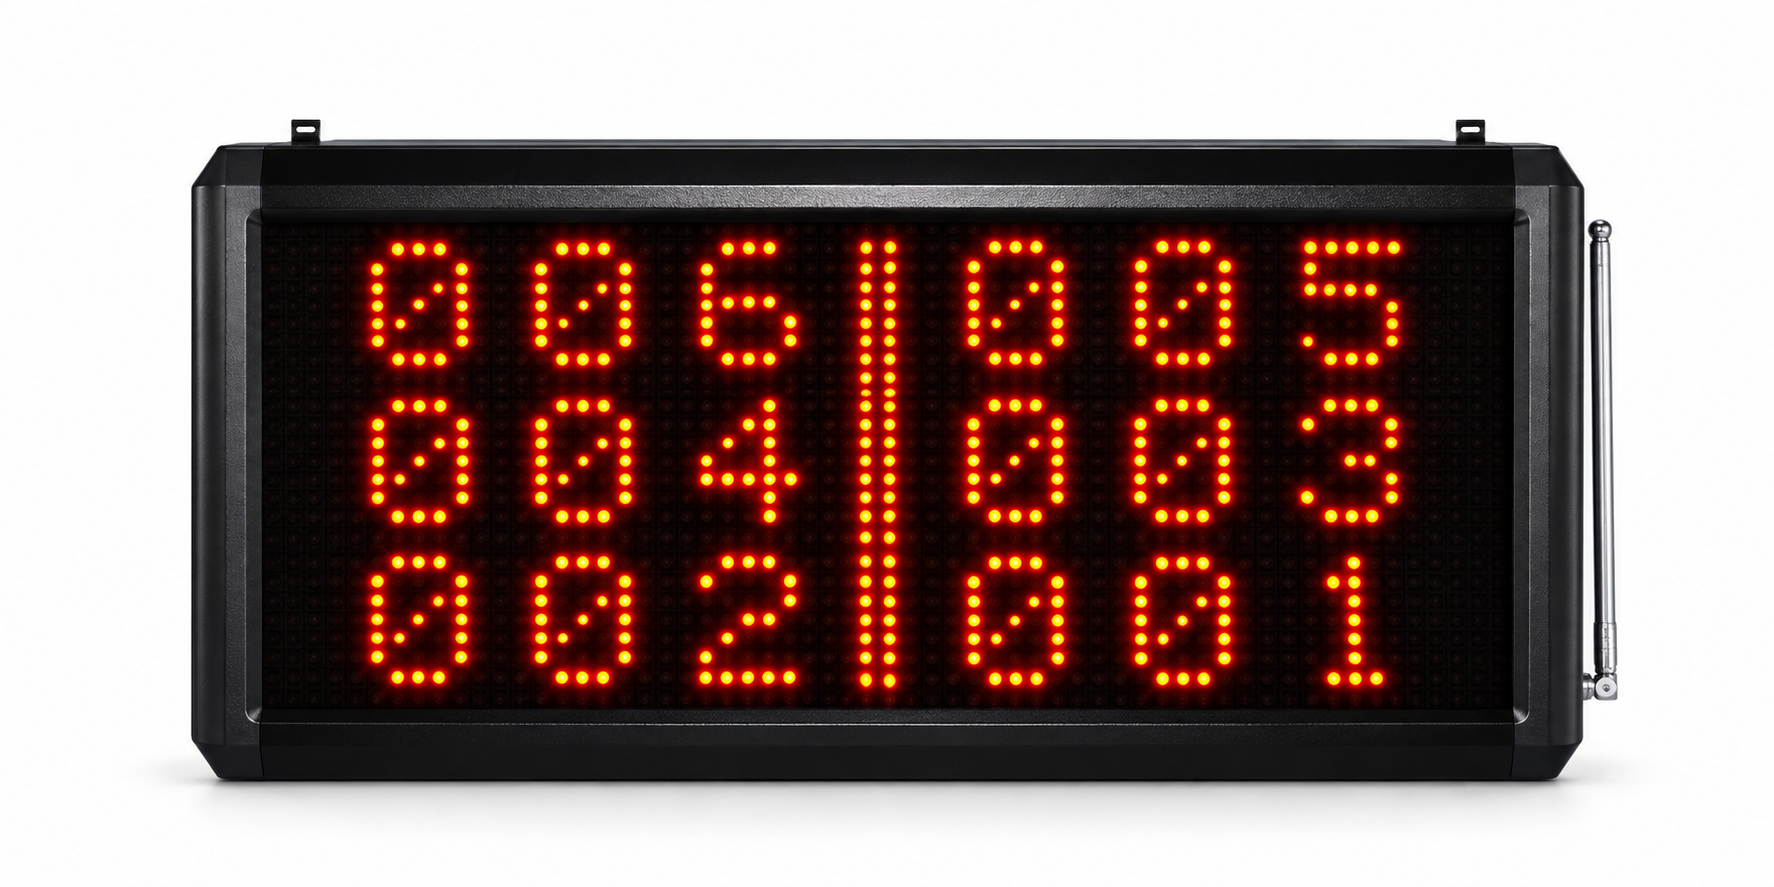
With the monitor switched on, hold SET for about 3 seconds.
Use UP/DOWN to select “Set Time”. Press SET to open it.
Press SET to move to the next field. Use UP/DOWN to set the time.
Press RST. Check the time shown.
The available monitor manual describes time settings only; it does not describe a date setting.
The receiver pairing steps apply to both the classic table call button and the acrylic CM‑4. The classic model has DRINK, FOOD, CASH, CARD and CANCEL; the CM‑4 has CALL, ORDER, PAY and CANCEL. CALL requests service. ORDER calls staff to take an order, PAY asks for the bill, and CANCEL cancels the call. Assign only the buttons on your model.
Hold SET for about 3 seconds.
Use UP/DOWN to select “Set Number”. Press SET to open it.
Press SET to select a digit. Use UP/DOWN to set the table number, for example 1.
Press any button on the table call button. The monitor confirms the connection with “Setup Successful” and “OK”.
“Setup Successful” and “OK” confirm that the assignment has been saved. Press RST to return to the normal display.
Press RST to return to the menu. Use UP/DOWN to select “Set Keyvalue” and press SET.
Use UP/DOWN to select the required function. Press the matching table button and wait for the beep. For the classic model, repeat for DRINK, FOOD, CASH, CARD and CANCEL; for the CM‑4, assign CALL, ORDER, PAY and CANCEL.
Press any button on the table call button. Check that its assigned table number appears on the monitor.
Repeat the steps for each table call button. Use the same table number as on the pager watch.
For operators: save a web address on the NFC insert and test it before use in the restaurant.
This NFC guide applies to the classic NFC table call button and the acrylic CM‑4. On the CM‑4, hold the phone near the NFC mark on the acrylic panel. Radio calls work independently.
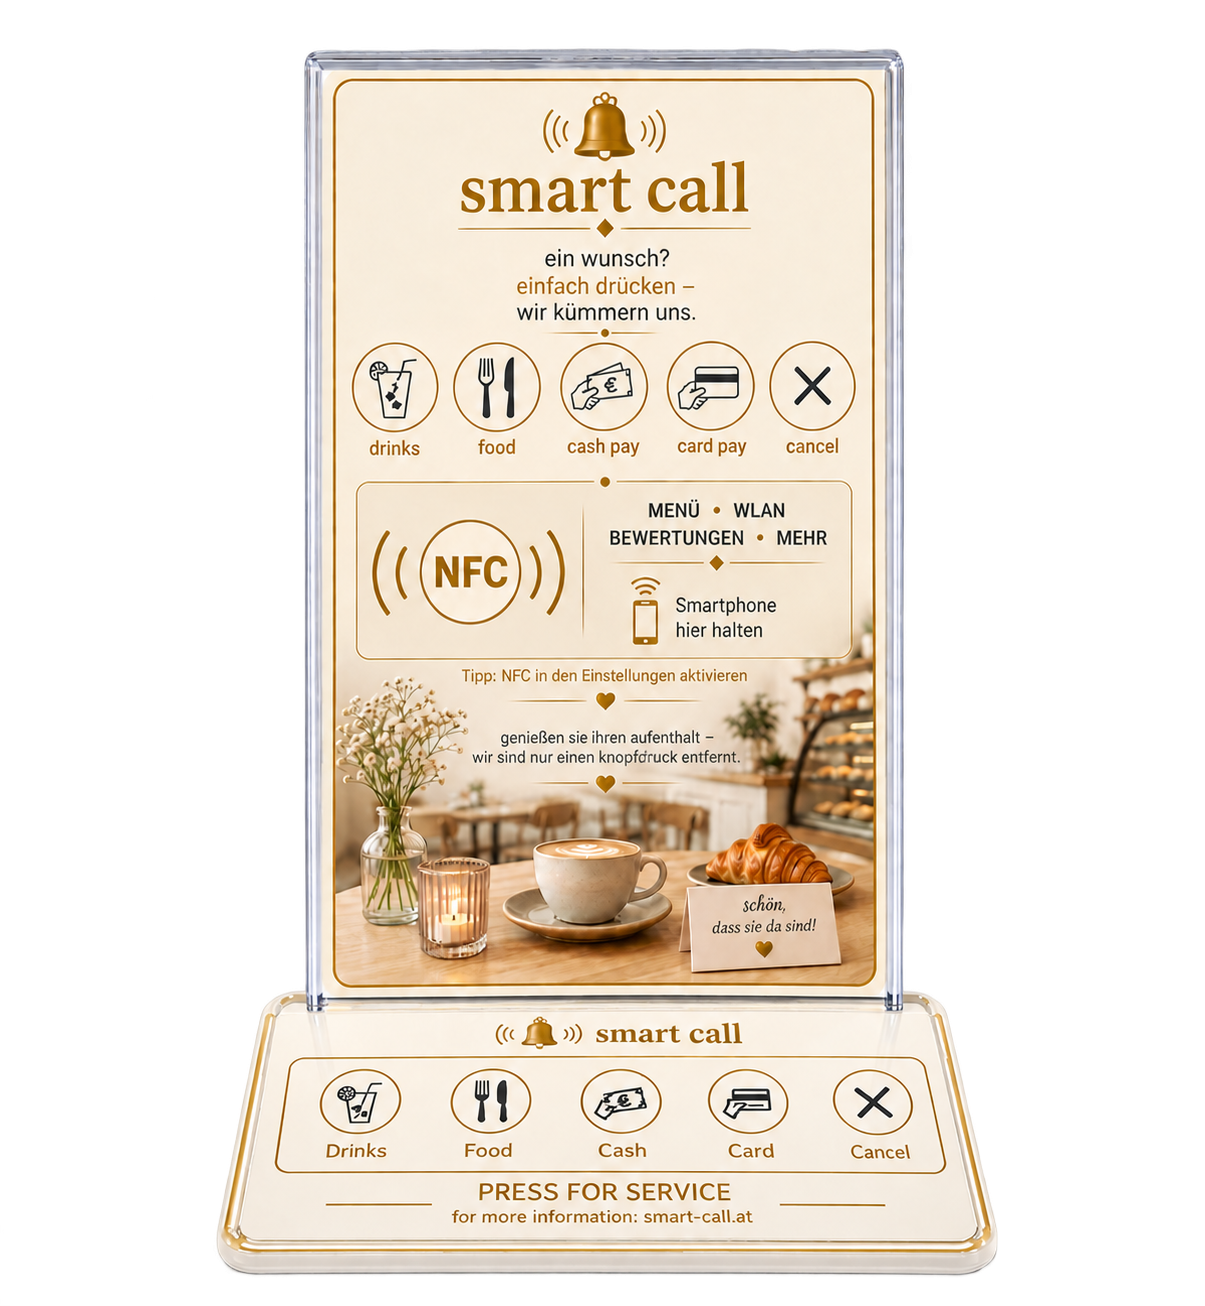
Open NFC Tools on your iPhone or Android smartphone. Select Write → Add a record → URL/URI.
Enter the full web address of the page you want to open, such as your menu. Tap Write, then hold the phone against the insert’s marked NFC area until the app confirms writing.
In NFC Tools, select Read and scan the chip again. Check that Record 1 shows the saved web address.
Close NFC Tools. Unlock the smartphone and hold it against the marked NFC area. Open the notification and check that the required page appears.
If needed, write a new web address to the chip. You can link to pages for the menu, daily specials, Wi-Fi or reviews. Do not write-protect the chip if you plan to change it later.
For day-to-day use: test every newly saved address with a smartphone. Leave the chip writable if the menu or other content may change. The five call buttons work independently of NFC.
Choose a location, connect the device and test a call from the most distant table call button.
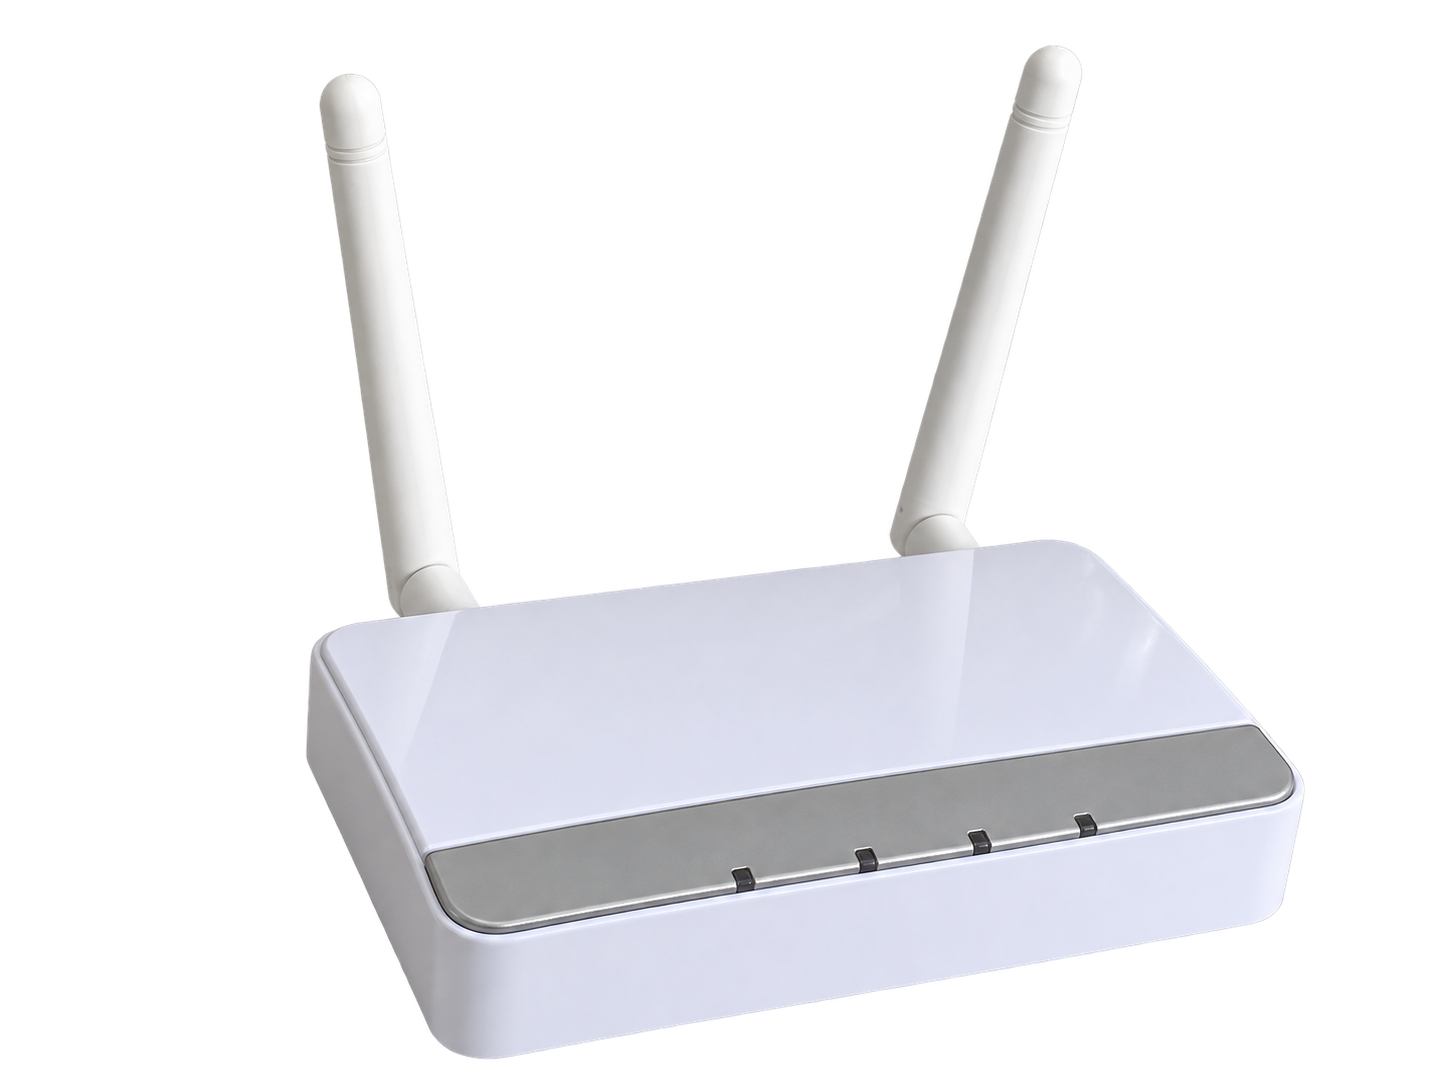
Place in a dry location at least 1 m from metal and electronic devices.
Point the antennas upwards or slightly outwards, and route the power cable down to the left.
Connect DC 12 V / 1 A. The red light indicates power.
Activate the most distant table call button. Check reception at the repeater and the call on the watch or monitor; adjust the location if needed.
Pager watch operating instructions. Menu names match the device; the following sections explain how to use and configure it.
The watch receives calls wirelessly from paired transmitters. The manufacturer’s manual describes a TFT colour display, custom transmitter names, sound, vibration and light alerts, stored call events, calendar, alarms, timer, scheduled shutdown and transfer of settings between two watches by cable. Before use, configure table call buttons and button functions appropriately.
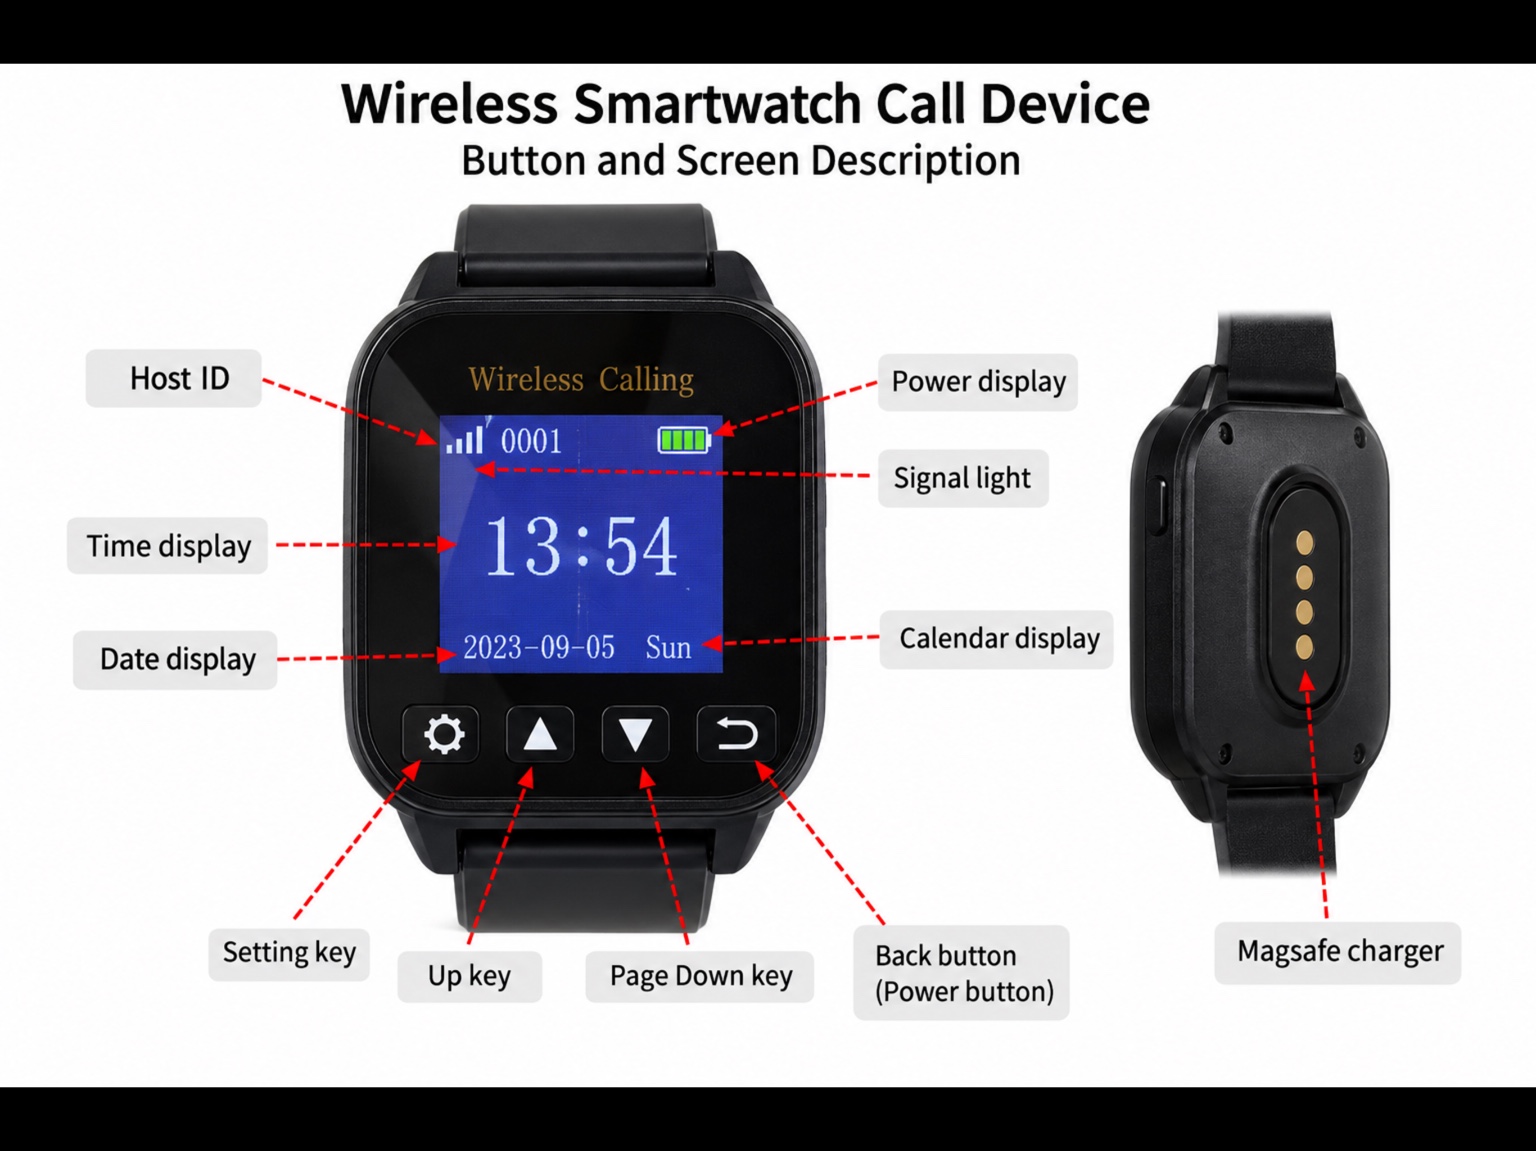
The main display shows the device ID (Host ID), signal and battery levels, time and date. The four front buttons are ⚙ Settings/Confirm, ▲ Up, ▼ Down and ↩ Back/Power. Hold ⚙ for three seconds to open the menu; press briefly to open or confirm an item. ▲/▼ select items or values; holding them speeds up adjustment. ↩ returns and saves as specified in each menu. The magnetic contacts are used for charging and data synchronisation.
| Manual specification | Value |
|---|---|
| Case / wristband | 42 × 53 × 15 mm / 22 × 220 × 1 mm |
| Battery / power supply | 3,7 V, 450 mAh / 5 V, 1 A |
| Receive frequency | 433,92 MHz |
| Quiescent current / sensitivity | < 12 mA / −113 dBm |
| Ambient temperature | −20 to +55 °C |
The indicator is red while charging, green when fully charged and blue during operation. With the screen off, it may flash blue at intervals.
When switched off, hold ↩ for about three seconds; this also applies while charging. To switch off, hold ↩ on the main screen for about three seconds. On the confirmation page, press ⚙ briefly to switch off, or ↩ to cancel. A short press of ↩ locks the screen; another short press wakes it. The manual describes a low-battery warning and automatic shutdown after a 30-second countdown.
After pairing, a call shows the transmitter number, the pressed button’s function name, the call time and the call counter. If no function name has been assigned, Call appears. Our Smart Call pager watches display four active calls simultaneously in the call view. Press ↩ to delete the selected call entry.
Hold ⚙ for about three seconds. Call Records is the first menu item. Open it with ⚙, use ▲/▼ to browse previous calls and press ↩ to return. The manual specifies storage for up to 100 calls.
Open Alarm Clock in the settings menu. Use ▲/▼ to select one of the four alarms and press ⚙ to edit it. Use ⚙ to move between time, weekday and on/off, and ▲/▼ to change values. Press ↩ to exit. Alarms work only when the watch is switched on.
Open Timer. Use ⚙ to move between the time fields and on/off, change values with ▲/▼ and save with ↩. The selected alert sounds when the timer expires.
Open Time and Date. Use ⚙ to move through minutes, seconds, hours, month, day and year. Change each value with ▲/▼ and save with ↩. Check the time and date on the main display.
In the relevant menu item, select a text or background colour with ▲/▼ and save with ↩.
Select the menu language and save with ↩. The photographed manufacturer’s manual lists English only for this software version; use other languages only if available on the actual watch.
Screen Off Time sets the screen timeout from 1 to 999 seconds. This does not delete calls. With the screen off, press ⚙ or ↩ to wake it. Under Screen Brightness adjust brightness with ▲/▼ and save with ↩.
In the menu, set the scheduled shutdown switch, time and weekday, then save with ↩. A switched-off watch receives no calls.
Under Prompt Mode, choose sound and vibration, vibration only, sound only or silent. Under Prompt Count, set the repetitions: the manual specifies 1–99, with a factory setting of three. Test both settings with an actual call.
Hold ⚙ for three seconds. Select Administrator Options with ▲/▼ and open it with ⚙. If password protection is enabled, the manual’s default password is 0000. After changing transmitter or button settings, always test operation.
Transmitter number and table number: During pairing, you assign a call number to a transmitter. For a table call button, this call number can match the table number. The watch’s own Host ID / Local Number is a separate identifier.
Identify an individual pairing using the relevant transmitter button, then delete it in the corresponding menu. Delete all numbers removes every paired transmitter: select Yes only if this is intended, then perform the long confirmation required by the menu. You must then pair the transmitters again. Do not delete an individual pairing until you have identified the correct transmitter.
The manufacturer’s manual calls this menu Button Function Settings. Depending on the software version, it may also appear as Keyvalue Define. Select a function, then press the corresponding physical button on the table call button. A beep and the changed button value confirm the assignment. The manual specifies 100 function values. Assign DRINK, FOOD, CASH, CARD and CANCEL in sequence and test each button individually. Default resets button values and Clear All deletes them; use these options deliberately.
Local Number sets the watch’s ID from 1 to 255; the ID appears on the main display. Under Flight Mode, switch flight mode on or off. The watch receives no call notifications while flight mode is on.
Auto Clear Time sets when a call is automatically removed: 1–999 seconds, with a factory setting of 120 seconds according to the manual. This is independent of Screen Off Time. A value of 90 seconds is a possible setting for daily use, not the factory default. Timeout Reminder Time repeats a reminder while a call is still displayed: 1–999 seconds, with a default of 0 according to the manual.
In the administrator menu, open the factory reset, deliberately select the value and perform the long confirmation. Then check the time, transmitters and button functions and set them up again if necessary. This is not the first step for an incorrectly named button.
The manual describes a separate synchronisation cable. On the configured watch that will send the data, open Data Synchronization, then connect both watches. The receiving watch does not need to open the menu first. When Connection Status: connected appears, use ⚙ to move between transmitter data, system settings and date/time, and ▲/▼ to select what to transfer. Go to Main Mode – Start, hold ⚙ for about three seconds and wait for progress on the receiving watch. Disconnect the cable only when the transfer is complete. Do not set both watches to send or move the cable during transfer. Finally, send a call to both watches.
Under Administrator Password, you can enable and change protection for the administrator menu. Use ⚙ to select a character position, ▲/▼ to change characters and enable or disable protection, and ↩ to save. The manual lists digits, upper- and lower-case letters and special characters. Keep a secure record of the new password.
If forgotten, the source describes two recovery methods: transfer settings from another accessible watch using Data Synchronization ; or, after an incorrect attempt in the password dialog, at Long press to confirm perform the sequence of long button presses described in the original (⚙ at least three times, then ▲ and, after the message, ▼ for about three seconds each). As this concerns administrator settings, verify on the actual device on site and then set a new password. Under Version Information you can check model, software and hardware versions; return with ↩.
For long periods without use, fully charge and switch off. Recharge promptly when the low-battery warning appears. The watch does not receive calls in settings mode. Transmitters from other manufacturers may use different button values; test and reassign functions individually.
SmartCall checks before handover: Activate every table call button and each of its five buttons individually. Check number, function name, tone or vibration on every watch in use. Also test Card and Cancel separately; scroll through further calls with ▲/▼. Exit the menu and flight mode before returning the watch to service.
Source: Wireless Smart Watch Calling Device User Manual V1.0 — manufacturer’s manual.
Operating instructions. Source: Wireless Queue Caller System – Multi-group dot matrix host, D311.
| Specification | Manual specification |
|---|---|
| Monitor / optional keypad power supply | DC 5 V / 2 A · DC 5 V / 1 A |
| Operating frequency / modulation | 315 or 433 MHz depending on version · ASK/OOK |
| Receive sensitivity | better than −105 dB |
| Volume / speaker | 16 levels · one 2 W speaker |
| Case / weight | 160 × 325 × 45 mm · 912 g |
| Transmitters in call mode | up to 500 |
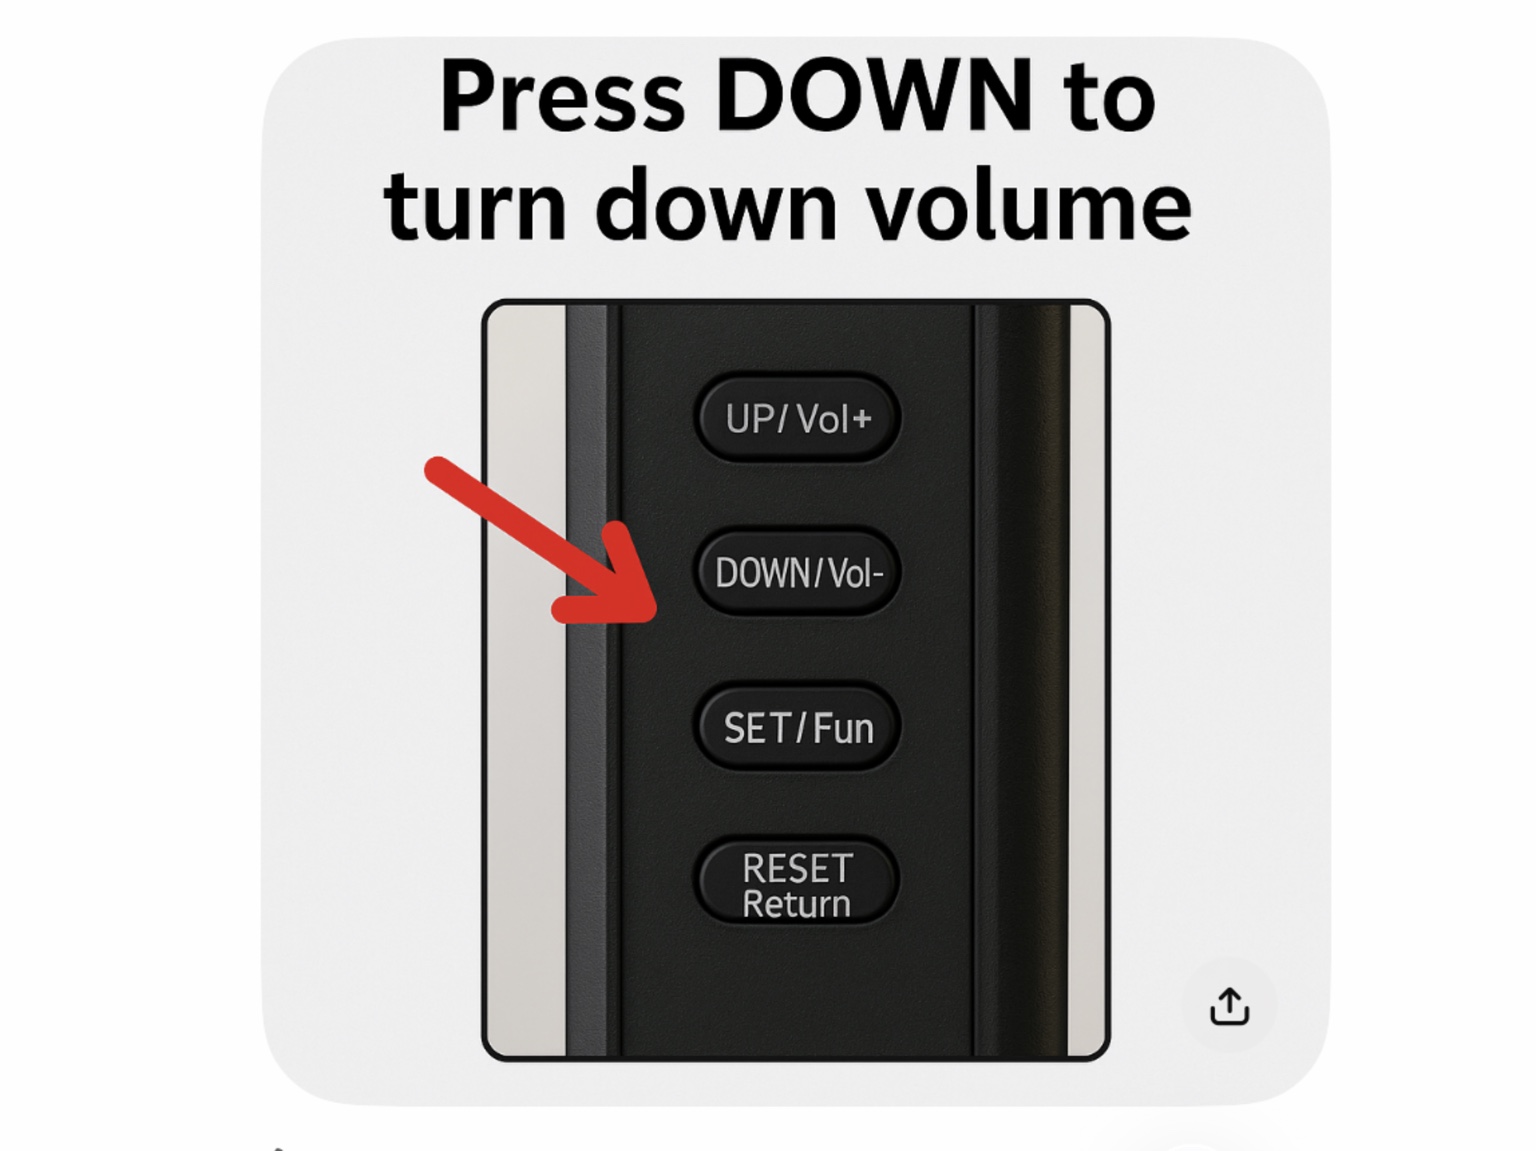
When power is connected, the entire display lights up. It then shows the model version, frequency, operating mode and paired-transmitter count, sounds a start-up tone and shows the time in standby. SET/Fun opens the menu and confirms selections. UP/Vol+ and DOWN/Vol− change a selection or the volume; RST/Return goes back. To open settings, hold SET for about three seconds. The first menu item is Prompt Music.
In standby, hold SET for three seconds, then press SET to open Prompt Music. Choose an option with UP/DOWN and press RST to return. The manual lists the following modes:
| Value | Output |
|---|---|
| 00 | No audible notification |
| 01 | Prelude + number |
| 02 | Prelude + number + button name (factory setting) |
| 03 | Prelude + room number + button name |
| 04 | Prelude + bed number + button name |
| 05–10 | One tone each: knock, water drop, chime, double chime, alarm or triple knock |
| 11 | Reserved for a customised voice |
Transmitter button function names are customisable. The actual spoken language depends on the installed firmware. Volume has 16 levels and should be tested in the restaurant.
Open Play Count in the settings menu. Set 1–999 repetitions with UP/DOWN, then press RST to return. The manual lists two announcements as the factory setting.
With several simultaneous calls, the monitor displays groups of six numbers. Cycle Time controls switching between groups; the default is 10 seconds. According to the manual, 0 seconds keeps the first group displayed, while 99 seconds shows the most recently called group. Hold SET for three seconds, use UP to select Cycle Time , open with SET, adjust with UP/DOWN and return with RST.
Clear Time sets when call data is removed from the display: 1–999 seconds, default 180 seconds. At 999 seconds there is no automatic clearing; the last number remains until removed manually with RST. Select the item with UP, open with SET, adjust with UP/DOWN and return with RST.
Open Set Keyvalue in the settings menu. Use UP/DOWN to select the function slot, then press the matching physical transmitter button. A beep confirms assignment. Assign DRINK, FOOD, CASH, CARD and CANCEL individually and test each one. Holding SET resets button values to the defaults; holding RST may delete all values. Use these options only when you intend to reset or delete the settings.
Open Set Time. Use SET to move the cursor and UP/DOWN to set the time. Press RST to return, then check the time on the standby display.
Open F9 Report and choose how numbers are spoken: as whole numbers in hundreds/tens, or digit by digit with or without a leading zero. Test the table codes you use with actual calls.
Under Prelude Select select the prelude tone. The manual lists 0 for no prelude and various chime, drop, beep and alarm sounds. Test the prelude and actual call announcement separately; return with RST.
Hold SET for three seconds. Use DOWN to select Delete All Num and press SET to open it. The default is No. Only if you intend to remove all transmitter assignments, change to Yes and hold SET. You must then pair the transmitters again.
Open Factory Reset. Only if you intend to reset the device, change No to Yes and hold SET for about five seconds. Wait for confirmation. After the reset, check all settings, numbers and button names again.
SmartCall checks before handover: Send calls from each table in turn. Check number, function name, tone or announcement and, where applicable, switching between groups of six. Cycle Time controls group switching, Clear Time removes a call; the two values are independent.
This guide applies to the classic table stand’s NFC insert and the integrated NFC chip in the CM‑4 acrylic panel. Radio calls work independently of NFC.
Choose the web address to open through the insert: a menu, daily special, Wi-Fi information page or review page. First open it directly in the smartphone browser and test it. The NFC chip stores the address; content is maintained on the linked page.
In NFC Tools, tap Write . Hold the smartphone steady against the insert’s marked NFC area until the app confirms writing. On an iPhone, bring the top of the phone to the area; on Android use the NFC antenna location for that model.
In NFC Tools, switch to Read and scan the insert again. Under Record 1 the entered web address should appear. Carefully compare it with the required address.
Fully close the app and unlock the smartphone. Hold it against the NFC area again, open the notification and check that the required page loads without errors. Repeat the test with the insert fitted in the stand.
If the destination changes, first read the existing records. Replace the previous URL record in NFC Tools, or erase the chip before writing again if the app would append multiple records. Then check that only the required address is stored and test normal phone operation. Do not write-protect the chip while later changes may be needed. Changing the content of an already linked webpage does not require reprogramming the chip.
Unlock the phone and slowly change its position over the NFC area. On Android, check that NFC is enabled; remove the case if necessary. Use Read in NFC Tools to check whether any record is present. If a second phone also fails to respond, check the insert and chip separately.
Important for operation: The NFC function opens a web address and is independent of the five call buttons. After each change, check both the stored address and the page actually opened.
Operating instructions. Source: Wireless Signal Amplifier Instruction Manual – Wireless PA-V3.0.
| Manufacturer’s manual specification | Value |
|---|---|
| Power supply / connector | DC 12 V / 1 A; 5.5 × 2.1 mm barrel connector |
| Operating frequency | 433.92 MHz |
| Standby / operation | < 10 mA / < 250 mA |
| Receive sensitivity | −113 dBm |
| Maximum transmit power according to manufacturer | 1300 mW |
| Range according to manufacturer | up to 1500 m in open, interference-free conditions |
| Case width × height / antenna height | 117,89 × 78,33 mm / 109,98 mm |
| Light | Meaning according to manufacturer |
|---|---|
| Red, steady | Power on. |
| Yellow, flashing | Identical signals detected within three seconds; further duplicates are not processed. |
| Blue, steady | New signal received and queued for forwarding. |
| Green, steady | Signal is being transmitted; reception is briefly suspended. |
| Yellow, green and blue flashing rapidly together | The received signal was forwarded recently and is not sent again. |
According to the manufacturer, the device automatically adapts to different pulse lengths without manual adjustment. For larger areas, determine locations in sequence starting from the most distant transmitter: each additional repeater must receive the previous repeater’s signal. Use only as many repeaters as needed for coverage to avoid interference.
Checks before handover: Send a test call from the most distant table call button and check the display on every watch and the monitor. Indoor range depends on walls and sources of interference.
The table call button sends radio calls to the paired pager watch and/or monitor.
This quick-start guide applies to the classic table call button and the acrylic CM‑4 table stand with NFC.
Pair the table call button with the pager watch, monitor or both.
Open the matching step-by-step guide below. It explains what to press on the receiver and on the table call button.
Once set up, press a button on the table unit. Check the table number and function on the paired receiver.
Register the transmitter, assign the Kitchen call label and test the call.
On the pager watch, press and hold the settings button for about 3 seconds.
Open Administrator → Add Buttons.
Select the required call number.
On the kitchen transmitter, press 1, then press the bell button.
Wait for confirmation of registration on the pager watch.
Repeat the procedure for the next pager watch: press 2 on the kitchen transmitter, then press the bell button. Register additional watches in the same way using 3, 4 and so on.
Open the settings menu on the pager watch.
Select Keyvalue define.
Select the Kitchen call label.
On the kitchen transmitter, enter the corresponding number, for example 1, and press the bell button.
A short beep from the pager watch confirms the assignment.
After the short confirmation beep, press the lower right button on the pager watch (with the curved arrow) once to confirm the setting and exit the Keyvalue define menu.
Repeat the assignment for additional pager watches using 2, 3 and so on.
On the kitchen transmitter, enter the number of the waiter you want to call, for example 2, and press the bell button. The assigned call number appears on the corresponding pager watch together with the label Kitchen.